The Bar View is designed as the primary interface for placing orders within OrdSys. It is optimized for use on a laptop situated at the bar during events. Additional views like the Delivery View, Waiter View, and Order History View are essentially different representations of the Bar View tailored for specific tasks.
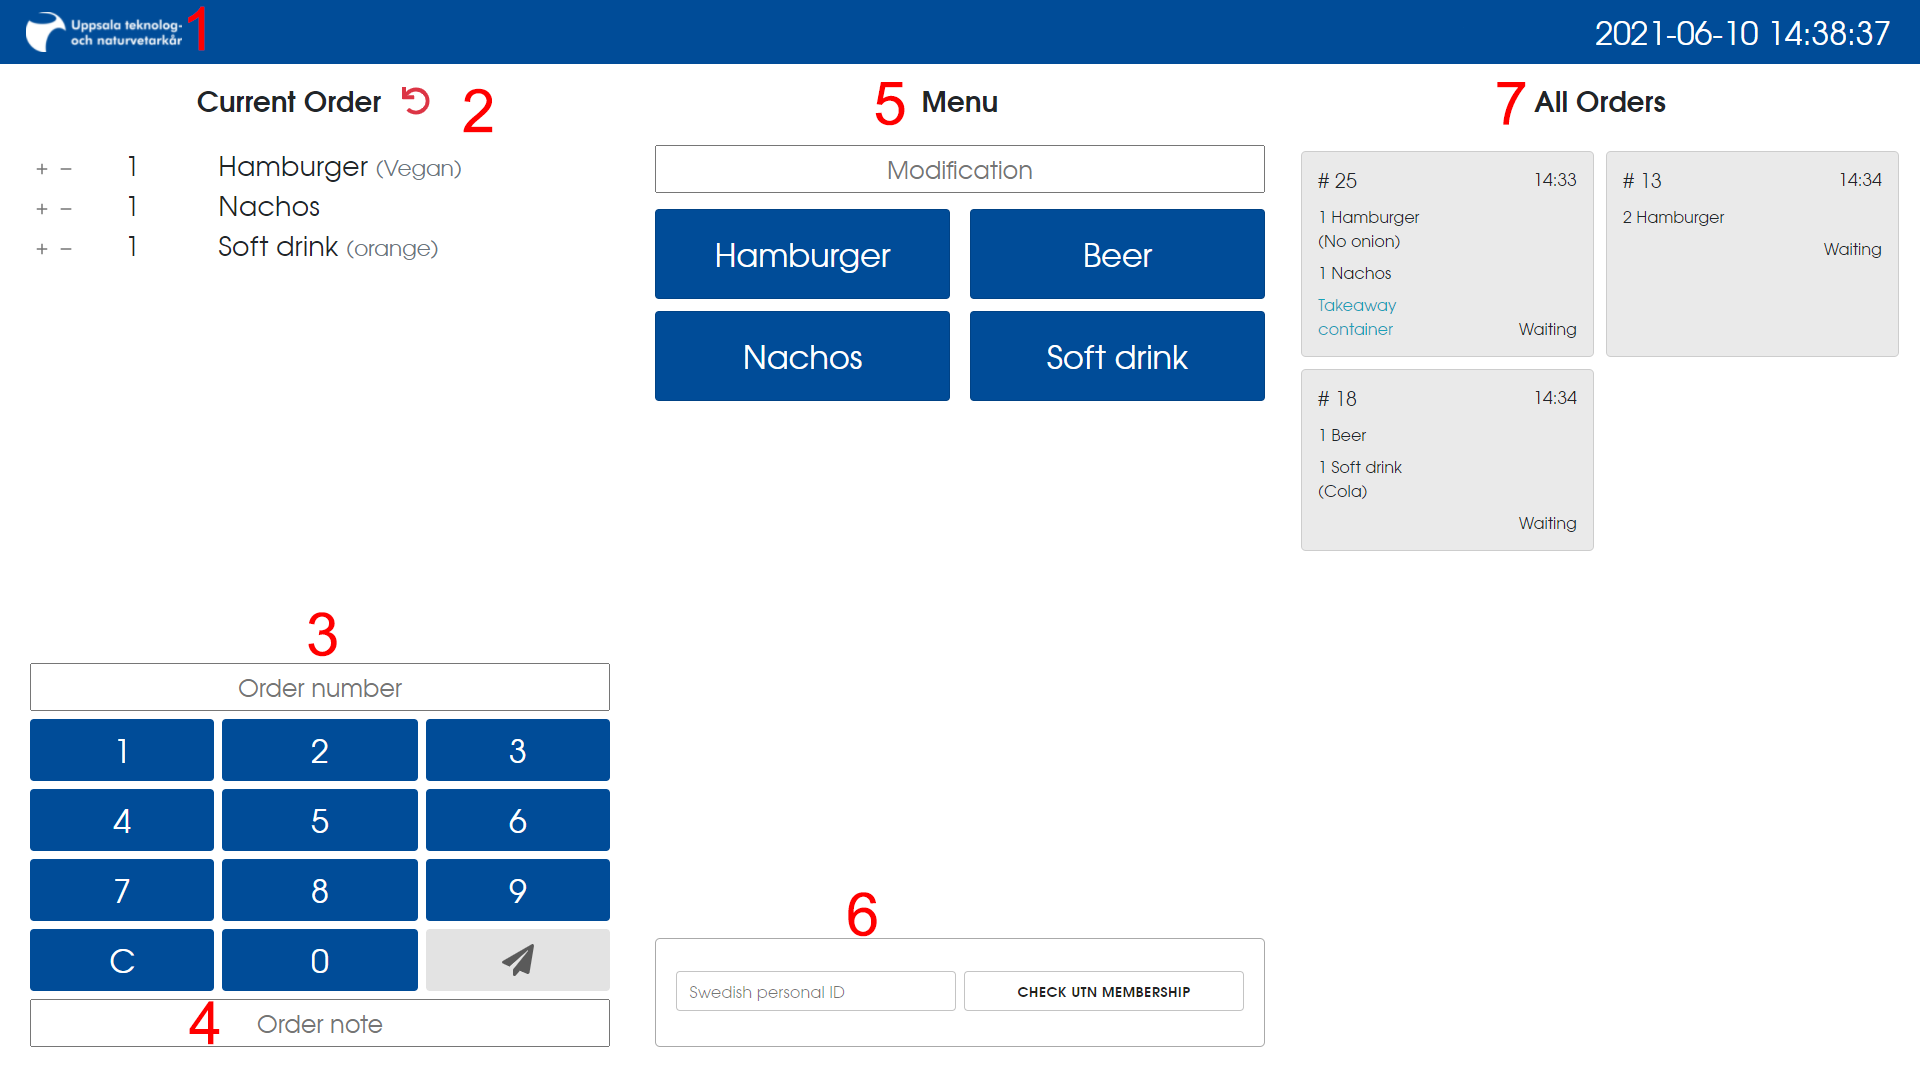
1. Organisation Logotype #
Located at the top left, the organization’s logotype allows users to quickly return to the Index View with a single click.
2. Current Order Area #
This section displays the items selected for the current order, their quantities, and any specific modifications requested. To increase the quantity of an item, click the plus sign; to decrease it, click the minus sign. If the quantity reaches zero, the item is removed from the order.
If you need to start a new order from scratch, simply press the red reset button located next to the “Current Order” heading. This will clear all items and modifications currently listed in the order.
3. Order Number and Numpad #
The order number is important as it identifies either the customer’s table or the number on a sign provided to the customer after placing their order. Use the numpad to enter this number.
An order must include at least one item and an order number to be finalized. When these criteria are met, the send button will change from gray to green, indicating that the order is ready to be submitted. Click this green send button to place the order.
4. Order Note #
The Order Note field is for entering any additional information that may be relevant to the customer’s order. This could include special instructions like:
- The customer is seated outdoors.
- The order should be prepared for takeout.
- The customer requests delivery at a specific time.
These notes are displayed in blue next to each order once placed, ensuring that important details are visible and can be accounted for by the staff.
5. Menu and Modification Field #
The menu list showcases all the items available for ordering during the event. To add an item to the current order, simply click the corresponding button. If the list of menu items exceeds the screen space, you can scroll through it to view more options.
For customized orders, use the modification field. Here’s how:
- Write the desired modification, such as “no onion.”
- Then, select the menu item, like “hamburger.”
- The item will appear in the current order with the modification noted next to it within parentheses (e.g., “hamburger (no onion)”).
It’s important to enter any modifications in the provided field before clicking the menu item button. The correct order is to first specify the modification and then select the item. For example, input “no onion” before choosing “hamburger” to ensure the modification is applied.
6. Membership checker #
To confirm a UTN membership, input the individual’s personal number and press “Check membership.” The button will indicate membership status by turning green for members or red for non-members.
7. Order column #
This column displays all active orders with details such as customer number, order contents, time placed, notes, and status. Clicking an order opens its detailed information window.
An order’s status can be one of the following:
- Waiting: Not yet processed.
- In progress: Being prepared.
- Done: Ready for pickup or delivery.
- In transit: Currently being delivered.
8. Order Information Window #
By clicking on an active order, an information window appears:
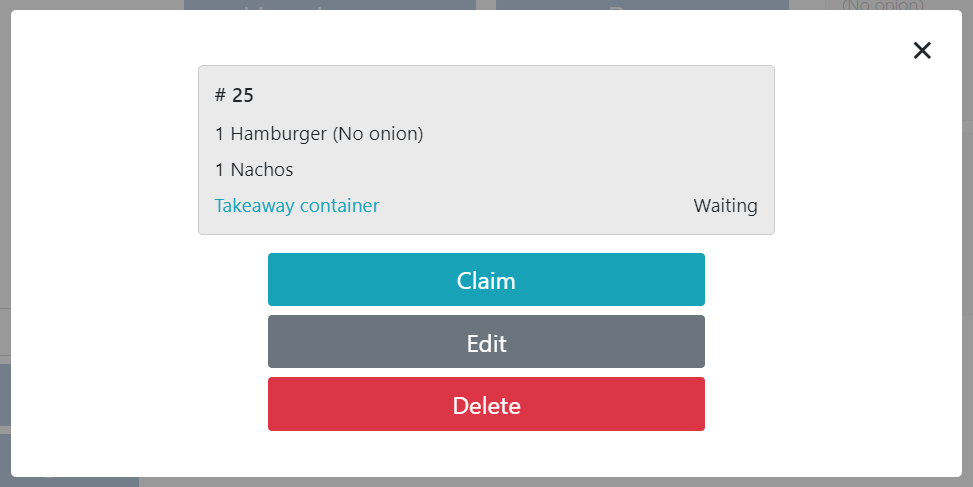
In this window, you’ll get a clearer view of the order and options to manage it. Depending on the order’s status, you will see either a “claim” or “delivered” button at the top of the window:
- Clicking “claim” changes the order’s status to “in transit.”
- Clicking “deliver” is only available for orders marked as “in transit” and will remove the order from the active view.
Additionally, there are options to edit or delete the order:
- The edit button allows for modifications to the order. For details on editing, refer to the relevant section below.
- The delete button permanently removes the order from the system and does not impact statistics.
Pressing the edit button in the order information window will open the order in edit mode.

The edit mode interface is similar to the order creation process. You can make various changes to the order without affecting its position in the queue. Available editing actions include:
- Adding or removing items
- Altering item modifications
- Updating the order note
- Changing the customer number
After making the necessary changes, press the send button to update the order. This will modify the current order rather than create a new one.
Orders can only be edited if they are in a waiting status. This is because orders with other statuses are either being prepared or have already been completed.
Beverage and food orders are separated at the time of creation and directed to the bar or kitchen. Therefore, you cannot add a beverage to a food order or food to a beverage order during the editing process. To combine different types of items, you will need to create a separate new order.