The “Settings” menu contains various administrative settings for the webpage.
Users #
The “Users” submenu lists all webpage users. While users can manually be added, it’s preferable for individuals to create their accounts via the login window.
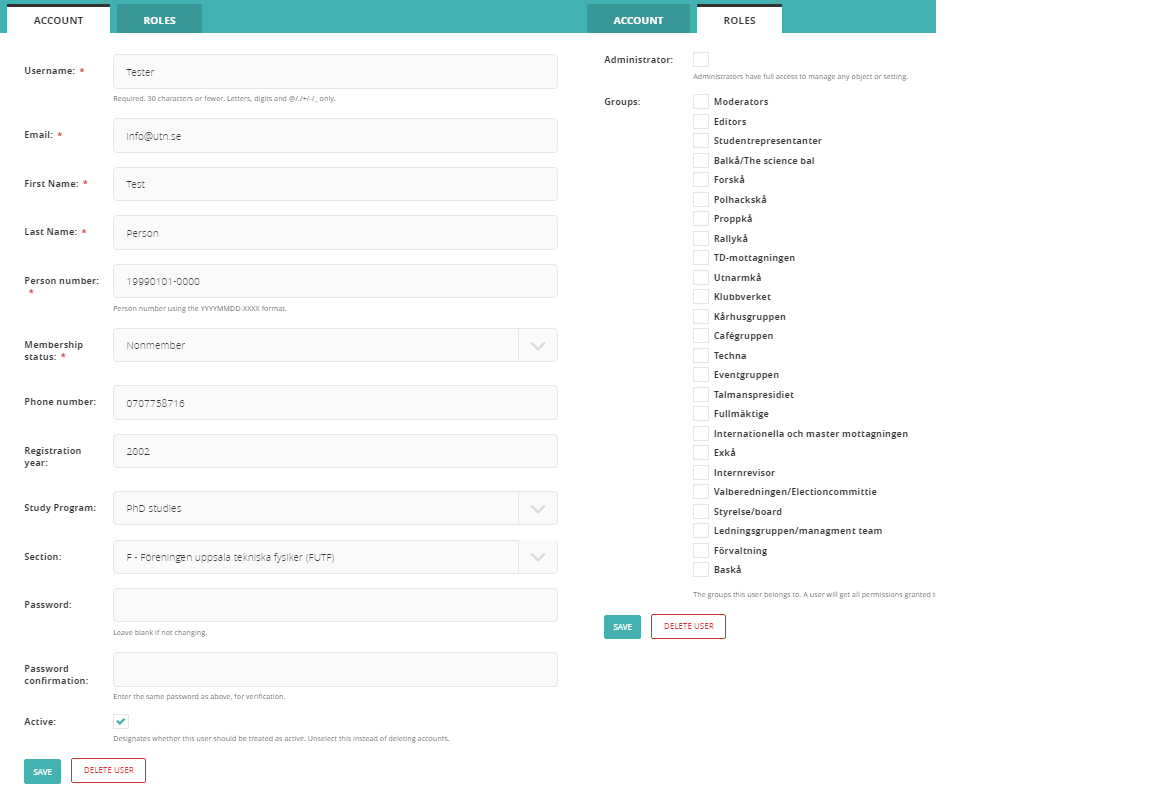
Add/Edit Users #
The image below shows what it looks like to add or edit a user. Complete all information and set the account to active. It’s recommended to mark old users as inactive rather than delete them, preserving their contact information. When editing a user, avoid changing the password unless necessary. Member status updates automatically.
The “Role” tab allows manual addition of users to groups, granting administrative rights. Typically, users automatically join groups during their term of office, but in special cases, manual addition may be required. Exercise caution, as manually added users retain administrative rights until removed.
The “Administrator” checkbox at the top grants full system access. This should be manually activated or deactivated and reserved for roles like the Information Officer and System Administrator. Being an administrator overrides group memberships.
Groups #
“Groups” handles the administrative rights for officials within a team/committee. These rights determine which pages can be edited and which parts of the application system are accessible. The menu will display existing groups and an “ADD A GROUP” button.
Adding/Editing Groups #
The example below shows the interface for adding or editing a group. The window lists various permissions for adding, changing, deleting, and granting specific access:
- Group – Manages groups
- Logo – Manages logos
- Social media accounts – Manages social media
- Section – Manages sections
- Study program – Manages study programs
- User – Manages users
- Redirect – Manages redirects
- Site – Manages system websites
- Other permissions include admin access, recruitment process management, and specific permissions for pages, documents, and images.
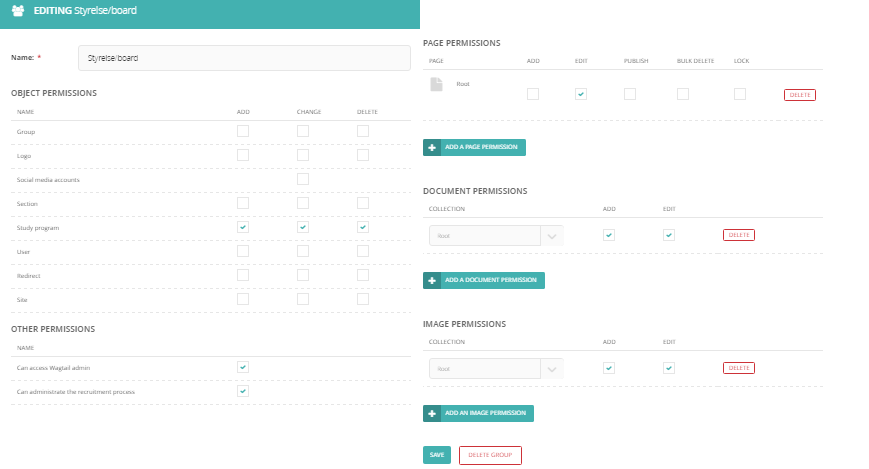
To set page permissions other than “root,” hover over the permission and click “CHOOSE ANOTHER PAGE” to select from the website’s pages. For documents and images, select from the dropdown list. Use the “ADD IMAGE/DOCUMENT/PAGE PERMISSION” link to grant multiple access levels.
Other Permissions #
The other permissions within the group settings contain various access levels and administrative capabilities that can be granted to different user groups. Here is a detailed list of these permissions:
-
Admin Access: This permission must be checked if members of the group need to access the admin interface of the website. It grants entry to the backend where content and system settings can be managed.
-
Administrate Recruitment Process: This grants full access to all aspects of the application system. Users with this permission can manage postings, applications, and appointments throughout the recruitment cycle.
-
Page Permissions: This allows the group to have specific access rights to different pages on the website. Assigning “Root” will grant full access to all pages. Otherwise, access can be restricted to certain pages based on the needs and responsibilities of the group.
-
Document Permissions: Similar to page permissions, this controls access to various document collections stored on the site. “Root” access gives full rights to all documents. Specific collections can be made accessible to the group as needed.
-
Image Permissions: This controls which image collections the group can access. Granting “Root” permission provides full access to all images. Alternatively, access can be limited to specific image collections.
When assigning these permissions, ensure they align with the roles and responsibilities of the group to maintain website security and integrity.
Sites #
The “Sites” setting manages different websites associated with UTN. Here, you can see existing sites and add new ones. This feature is for creating new websites, not pages, and should be handled by the System Administrator or Information Officer.
Collections #
In “Collections,” you can view and add collections for images and documents. Name collections clearly to distinguish between document and image collections.
Redirects #
The “Redirects” setting manages URL redirections within the system or to external links. The window lists all active redirects and provides the option to create a new one.
When setting up a redirect, select the originating page and the applicable site. Use “CHOOSE A PAGE” for internal redirects or enter an external URL in the “Redirect to any URL” box.
Social Media Accounts #
This setting allows the editing of links to the Union’s social media accounts. Changes here are typically unnecessary, and the links appear as icons at the bottom of the webpage (outside the admin window).